


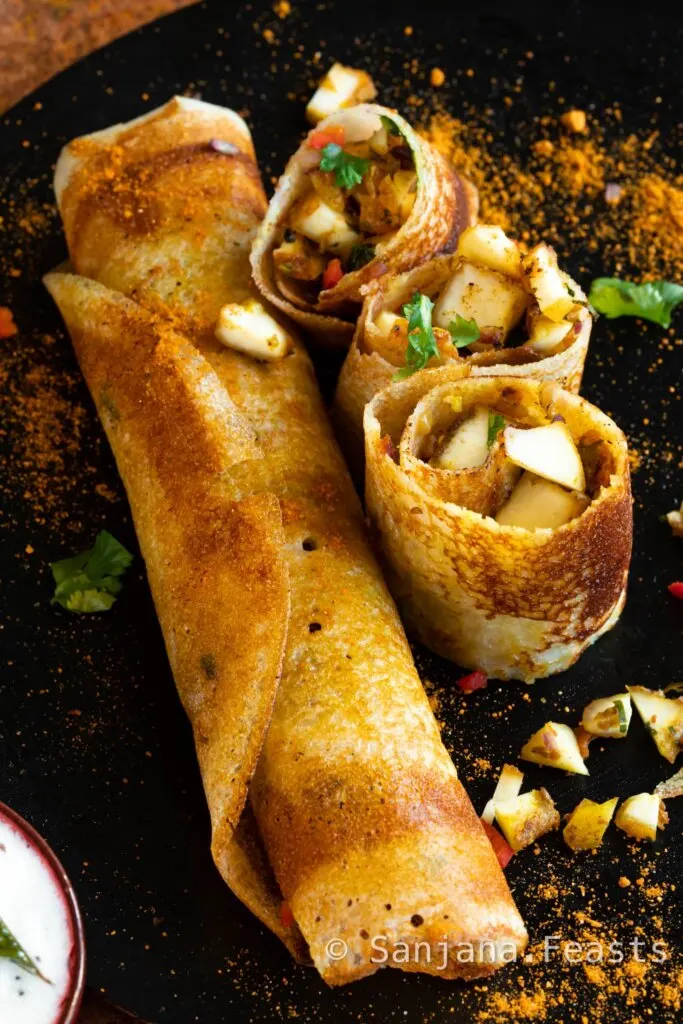
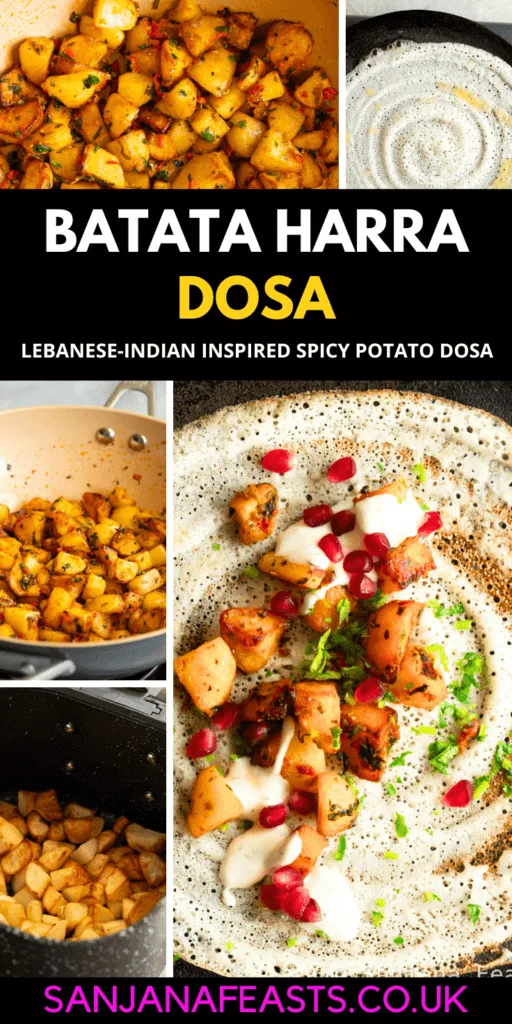
South Indian dosa meets Lebanese garlic potatoes in this recipe for Batata Harra Dosa. It’s fresh, vegan and delicious with juicy pomegranate.
What is batata harra?

Batata harra, which translates to ‘spicy potatoes’ in Arabic, is a popular Lebanese side dish made with crispy fried or roasted potatoes tossed in a lemony garlic and coriander sauce.
Like most heritage dishes, recipes will vary from home to home but the basic flavours usually remain straightforward.
The sauce typically combines garlic, fresh coriander, olive oil, lemon juice, and spices like paprika creating a delicious balance of heat, tang, and fresh herbs.

Enjoyed for its simplicity and bold flavors, batata harra is a common addition to mezze spreads and pairs well with grilled meats or can be enjoyed on its own.
It reminds me so much of the simple Indian Bateta nu Shaak I ate growing up in my Gujarati home. My mum would always cook that as a weeknight dinner and we’d devour the fluffy potatoes with rotli and a side of plain yoghurt.


This Batata Harra Dosa recipe is a coming together of all the flavours I truly love in a comfort dish.
The garlicky-lemony potatoes paired with the crunchy rice and daal dosa is almost like the long-lost sibling of South Indian Masala Dosa.
Who says fusion foods are half-baked ideas? This combination makes so much sense that I can’t believe I’ve never tried it before.
What are dosa?


Dosa, a South Indian staple, is a thin, crispy crepe made from a fermented batter of rice and lentils.
This savoury treat boasts a slightly sour and bitter flavour profile since it is ground with fenugreek seeds and fermented.
Traditionally enjoyed for breakfast or as a snack, dosas are typically served hot, rolled up, and accompanied by chutneys and sambar (a lentil stew).

They offer a gluten-free and vegan-friendly option that’s both versatile and super delicious.
Try my recipes for Masala Dosa, Paneer Masala Dosa and Neer Dosa here.
What’s the best pan for making dosa?
A good quality pan will help you cook the dosa evenly and prevent the batter from sticking to the pan. Opt for the flattest well-seasoned cast iron or anodised aluminium tawa.
In a pinch, you can also use a non-stick frying pan but the dosa may not be as crispy as cast iron-cooked dosa.
Whats the best rice for Batata Harra Dosa?
Idli rice (parboiled rice) has the ideal amount of starch for making dosa at home. Add a small amount of Basmati to heighten the aroma.
If you can’t find idli rice, another short grain rice like sona masoori or even Thai Jasmine rice works well.
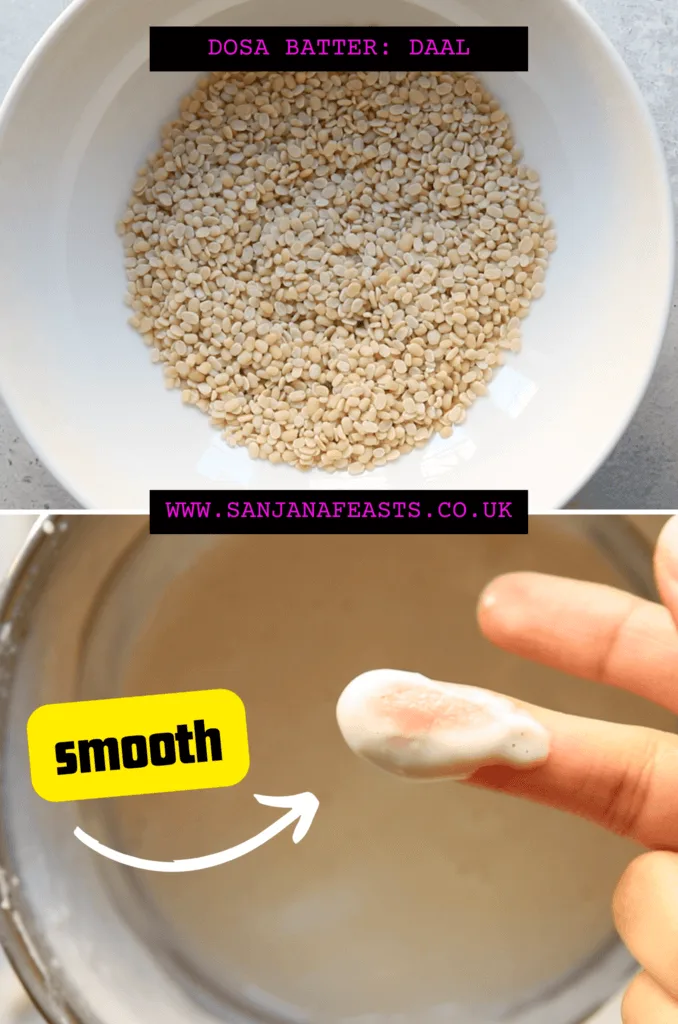
You will also need white urad daal (skinless black gram).
How to make Batata Harra Dosa: Step-by-step instructions
See recipe card below for ingredients and full measurements.
1. Soak the rice and daal
Soak the rice and white urad daal for at least 6 hours, or up to 8 hours. This will ensure the rice and lentils are well hydrated so they grind and ferment properly.
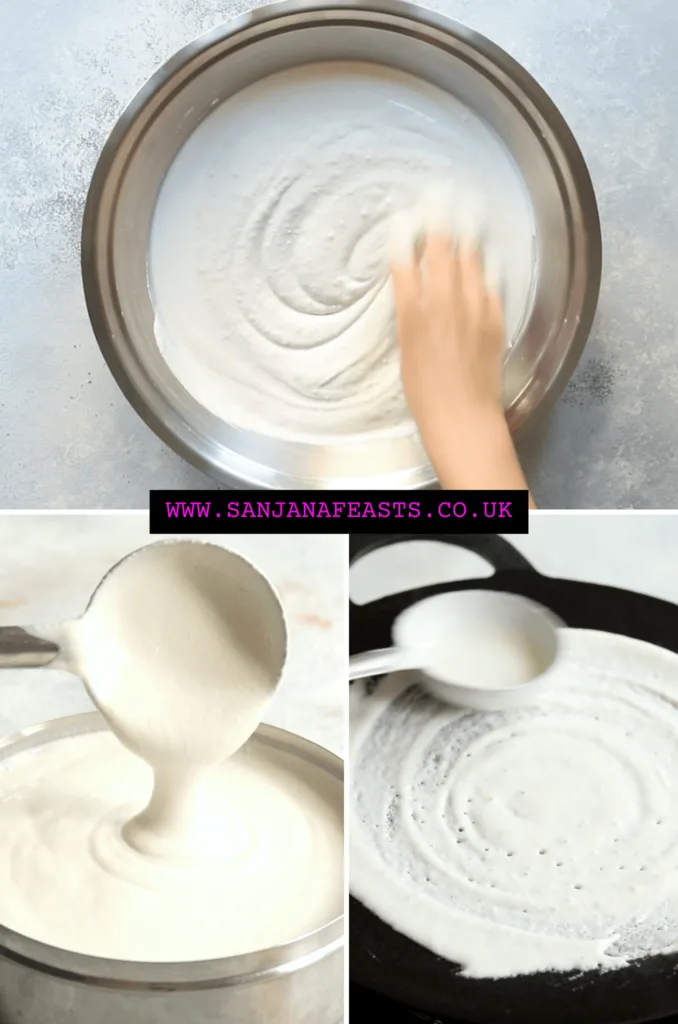
2. Grind the rice and daal separately before mixing


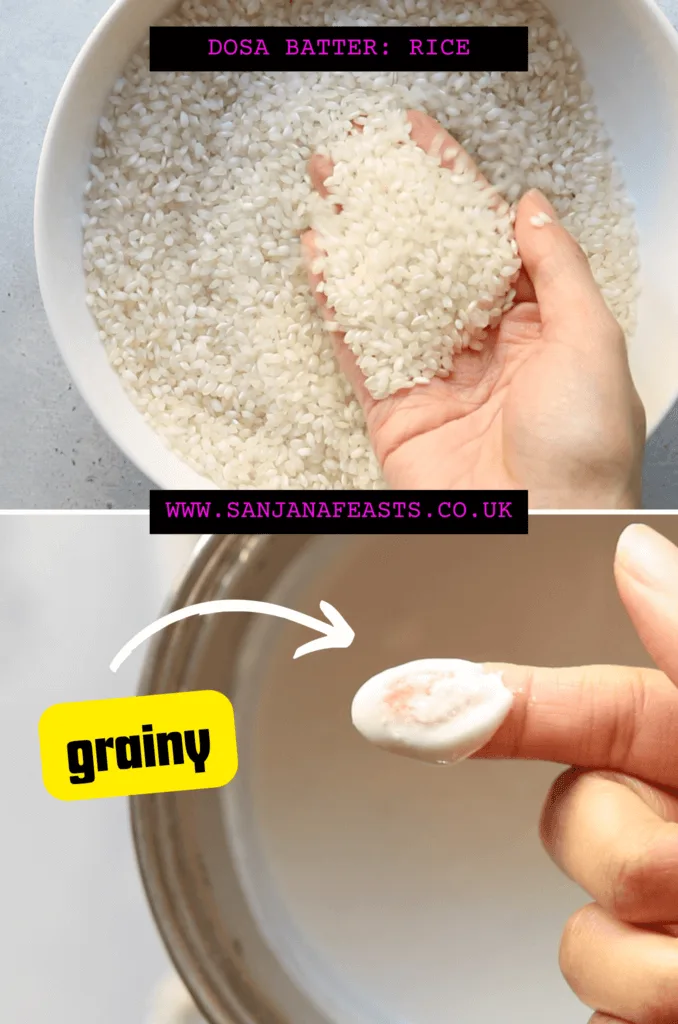
The rice batter should be mostly smooth, but still a little grainy, like that of a gentle exfoliator. This will produce crispy dosa.
It might seem tedious but this is the trick to getting the perfect, spreadable consistency for dosa.
The daal, methi and poha batter should be totally smooth. Its’ viscosity is what gives the batter a uniform body.
Mix the two batters together at the end using your fingers. The dual texture batters create the perfect dosa!
3. Ferment the batter

The key to making a perfect dosa is to ferment the batter well. 8-10 hours will usually suffice, but if it’s cold, it can take longer.
Fermentation helps to create the right texture and sour flavour of the dosa. Look for billowing air bubbles.
Do not add salt until the very end, after the batter has fermented. Salt will slow down the fermentation process.
Keep the dosa batter in a large, deep bowl, in a very warm place to encourage quick fermentation.
Oh, and before stowing away, whip the batter with your fingers for 3-4 minutes. The heat from your hands warms it for speedy fermentation, too.
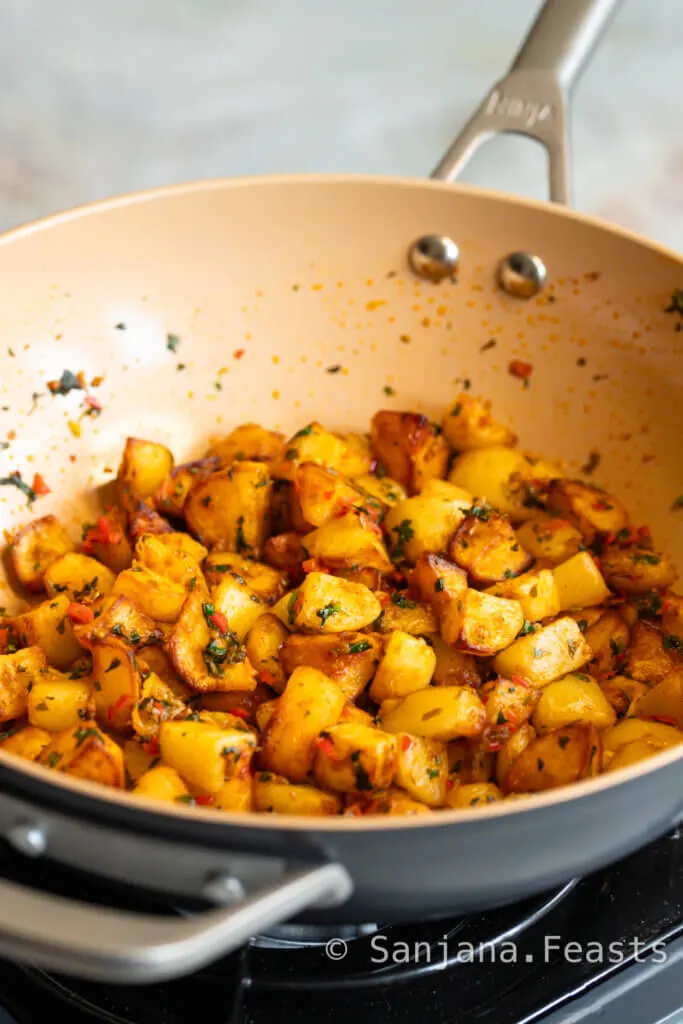
4. Make the Batata Harra

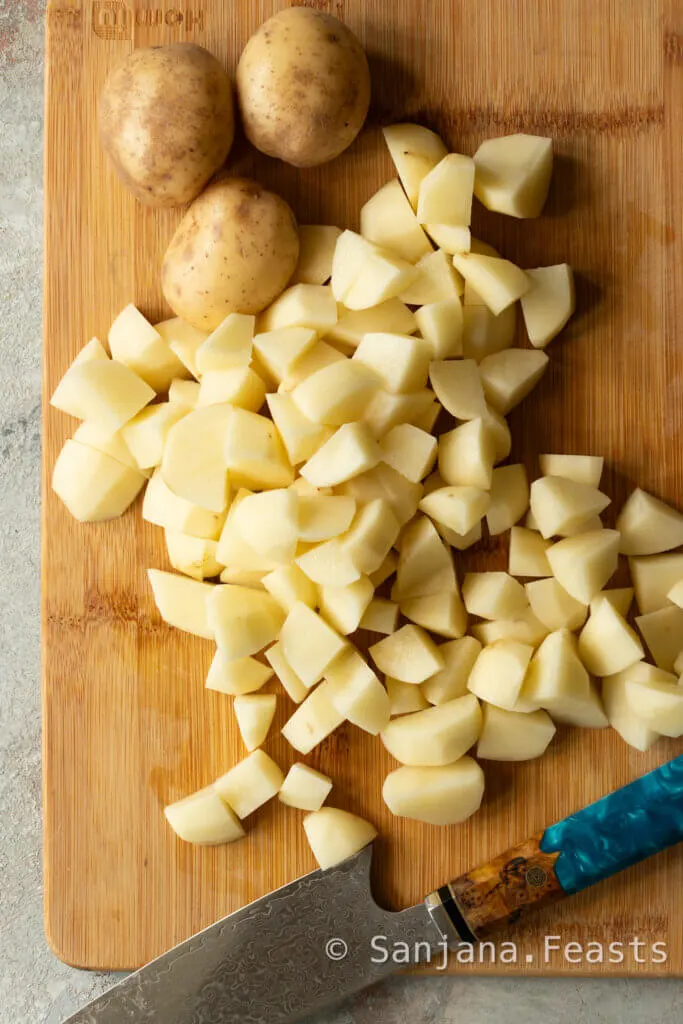

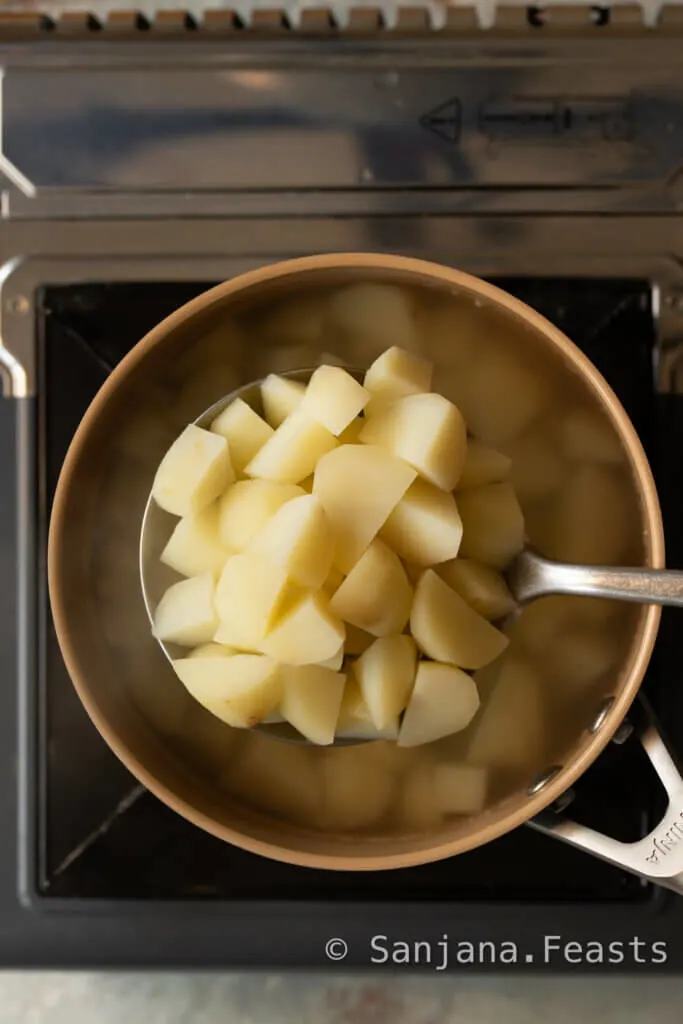

Boil the cubed potatoes in plenty of water for 3-4 minutes. They do not need to be soft. Drain and allow to steam dry for 5 minutes.
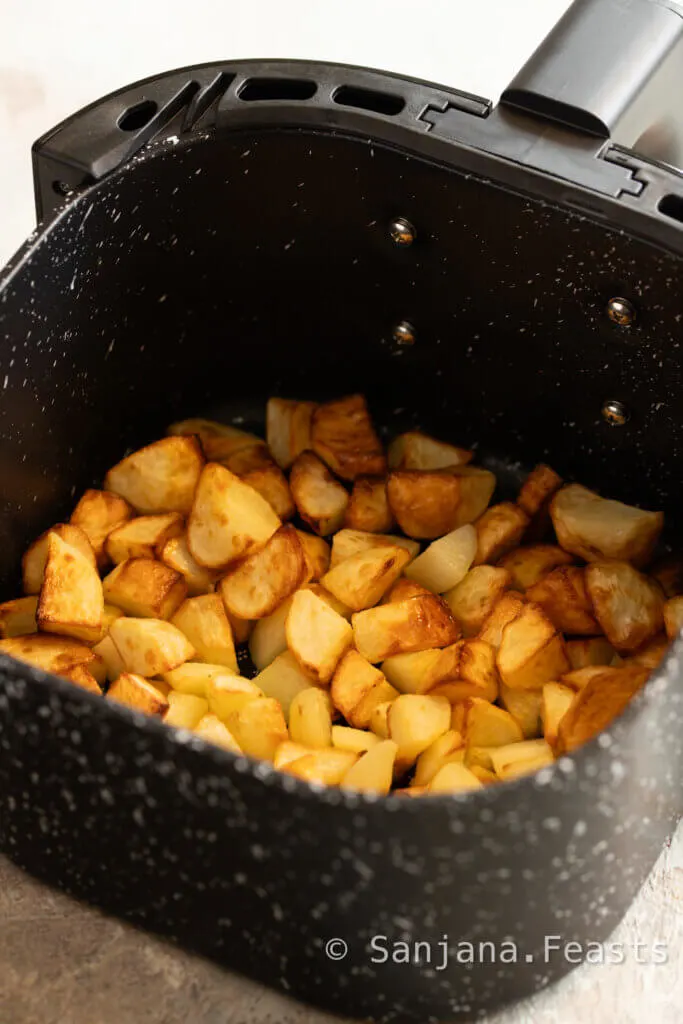
Toss with 3 tablespoons of olive oil and sprinkle with salt.
Air fry at 180°C/355°F for 10-12 minutes or until they’re a medium golden brown and cooked through. You’ll need to give the air fryer basket a shake halfway through. Alternatively, you can oven roast or fry the potatoes. Set aside.

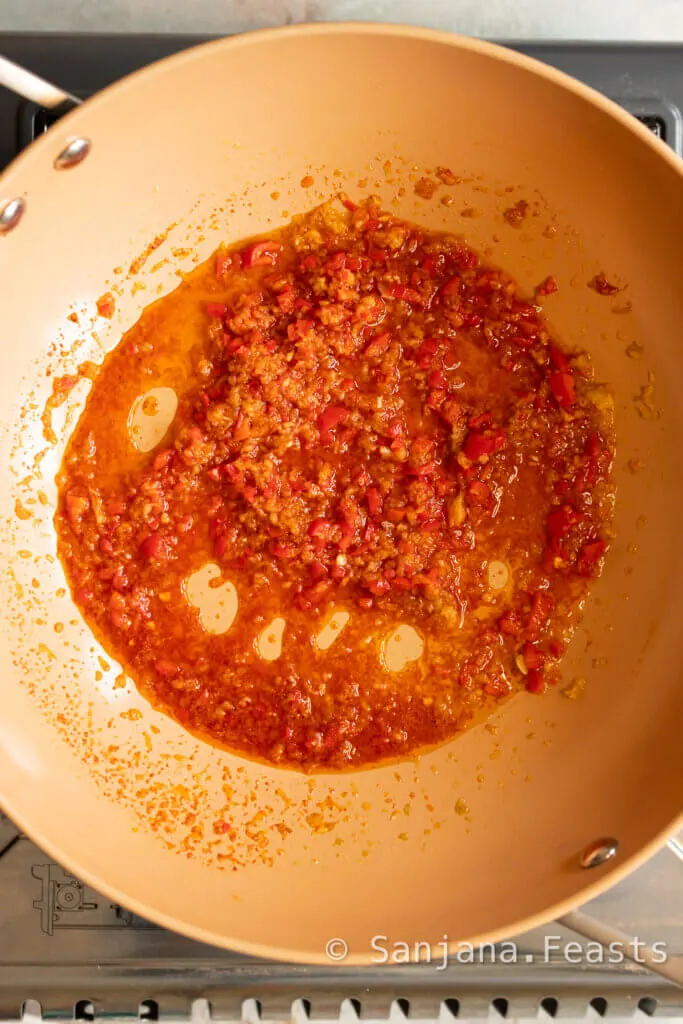
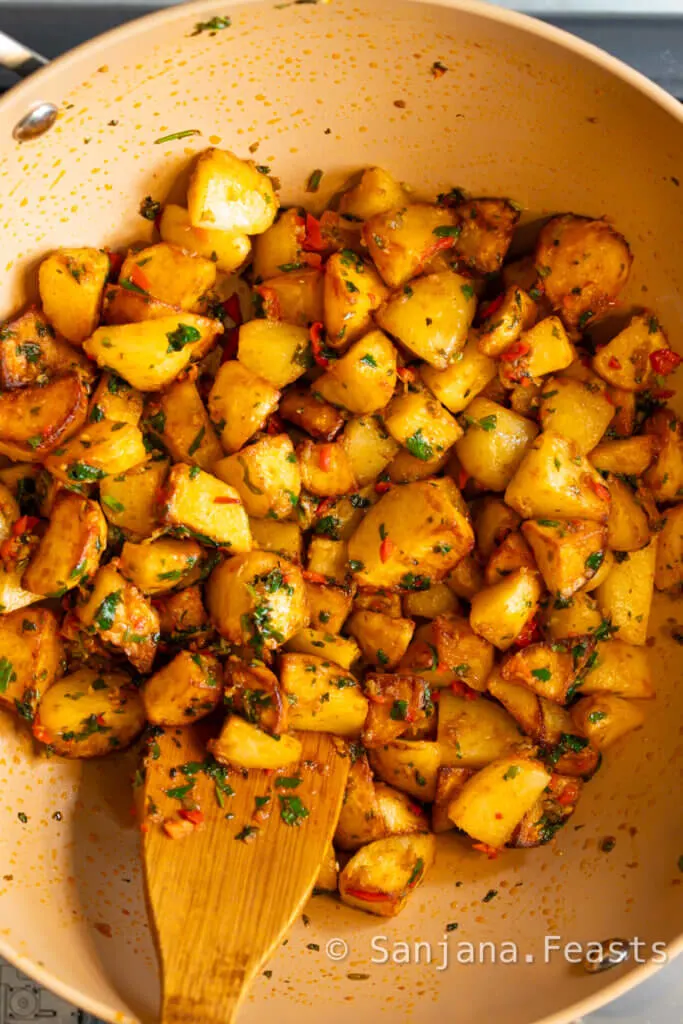
Heat the remaining 2 tablespoons olive oil in a large pan. Add the garlic, lemon zest and red chilli. Sauté for 1-2 minutes until aromatic.
Sprinkle in the paprika and add the lemon juice, coriander and parsley. Stir well and then quickly tip in the potatoes. Sauté for 3-4 minutes. The Batata Harra are now ready.
5. Spread and cook the dosa over a medium heat


Once fermented, adjust the dosa batter to a thick, flowing consistency with some lukewarm water.
Using a ladle, pour a spoonful of dosa batter on the tawa’s hot surface. Start from the centre of the tawa and use the ladle to spread the dosa batter thinly and evenly, in a circular motion.
Add a teaspoon of oil around the sides of the dosa and on top of it. This will help to cook the dosa evenly, with a golden brown colour and also prevent it from sticking to the tawa. Cook over a medium-low heat for 3-4 minutes for the crispiest dosa.
Once you spot the dosa starting to brown, the edges should start lifting away from the pan. If using cast iron or anodised aluminium, you might need to help it along using a spatula. Try not to prise the dosa from the pan – it will tell you when its ready by coming away by itself.
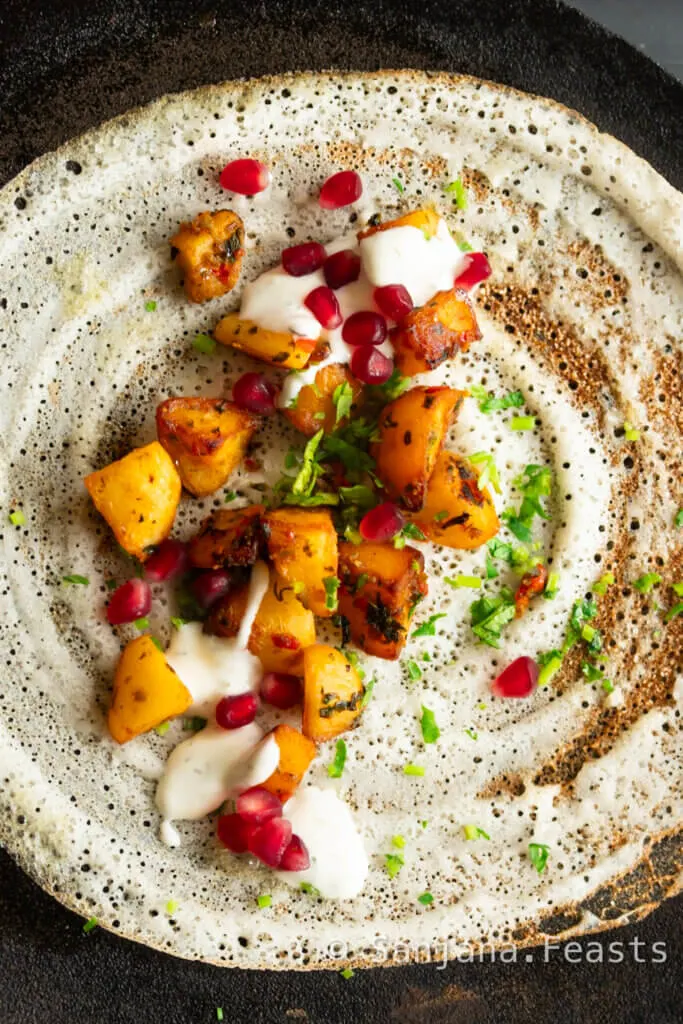
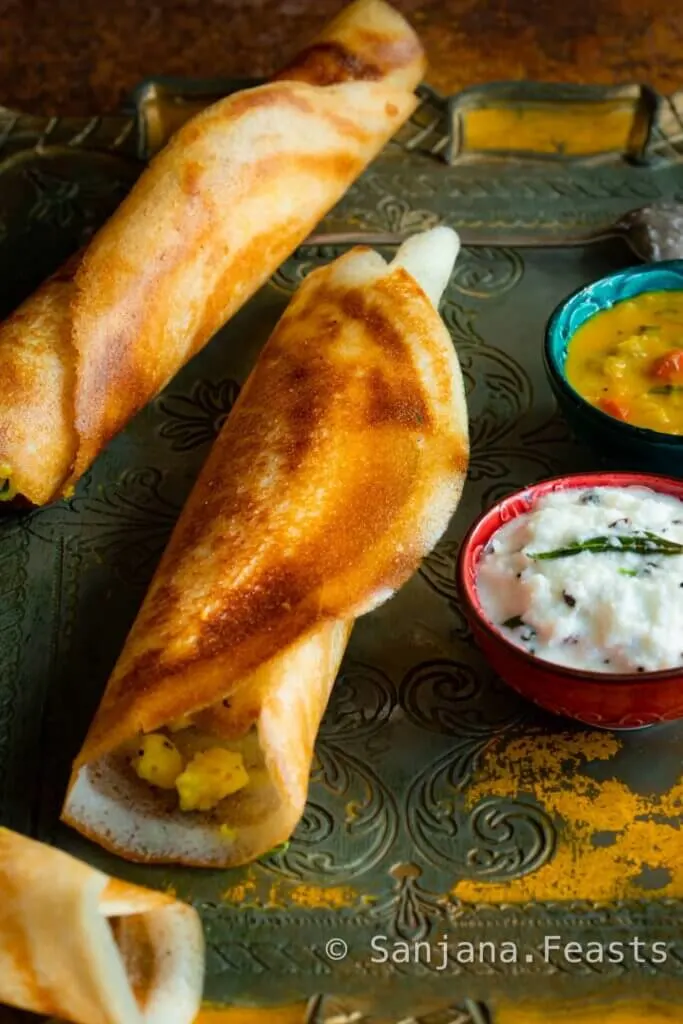
Spoon a few dollops of the Batata Harra filling on top of the dosa and add garlic sauce, pomegranate seeds and extra coriander or parsley, if desired. Carefully begin to fold the dosa or roll it into a cylinder. The underneath should reveal a beautiful golden brown colour. Remove the dosa from the tawa and serve immediately.
Batata Harra Dosa Recipe | How to make Lebanese-inspired Dosa with Batata Harra (Garlic and Chilli Potatoes)
Batata Harra Dosa


Learn how to make perfect, fusion Lebanese-style Indian Batata Harra Dosa. The dosa are stuffed with a potatoes cooked with chilli, lemon and garlic. So delicious! Add sweet pomegranate and garlic sauce to round off the flavours. Watch how to make dosa with my step-by-step recipe and video. From fermenting the dosa batter, to learning how to spread thin dosa, as well as dosa cooking techniques, this is the ultimate guide to making dosa at home.
Ingredients
For the dosa batter
- 650g idli rice (parboiled short-grain rice)
- 175g Basmati rice
- 1 1/2 tbsp poha (flattened rice flakes)
- 115g urad daal (white)
- 1/2 tsp methi seeds (fenugreek)
- Oil or ghee for cooking the dosa
For the Batata Harra filling
- 1kg potatoes, peeled and chopped into 1cm cubes
- 5 tbsp olive oil (divided)
- 1/2 tsp salt
- 1 red chilli, finely chopped
- 6 cloves garlic, minced
- 1 tsp sweet paprika
- Zest and juice 1 small lemon
- 2 tbsp chopped coriander
- 2 tbsp chopped parsley
Optional extras for serving
- Toum (Lebanese garlic sauce)
- Extra fresh coriander or parsley
- Pomegranate seeds
Instructions
- In a large bowl, mix together the idli rice and Basmati rice. Wash in plenty of cold water, changing the water 3-4 times. Top the bowl up with enough cold water to cover the surface of the rice by 3-4 centimetres. It doesn't matter exactly how much, just make sure it's plenty as the rice will bloat and absorb the water as it soaks. Cover the bowl and allow to soak for 6-8 hours.
- In a separate large bowl, mix the urad daal and fenugreek seeds. Repeat the washing process, changing out the water 3-4 times. Top the bowl up with enough cold water to cover the surface of the daal by 3-4 centimetres. It doesn't matter exactly how much, just make sure it's plenty as the daal will also absorb the water as it soaks. Cover the bowl and allow to soak for 6-8 hours.
- Drain both the rice and the daal. Reserve about 100ml soaking liquid from each. Keep the rice and daal separate at this stage.
- In a high-powered blender or wet grinder, grind the rice until it is of a flowing consistency, still with some very fine grains. You might need to scrape the blender down between blitzes to ensure even blade time. Do not add too much water. If your blender is struggling, add a tablespoon of water at a time. The aim of the game is to add as little water as possible. The batter should feel like very fine grains of salt when the batter is rubbed between the thumb and forefinger. If you're a visual learner, watch my recipe video to see the exact consistency required. Transfer the mixture to a large bowl.
- Next, grind the daal and methi mix, along with the poha. This time, you're looking for a very smooth batter with no gritty feeling when rubbed between the thumb and forefinger. Add this to the bowl along with the ground rice batter. Again, try to add as little water as possible whilst grinding.
- Use your fingers to whip the batters together until well combined. Cover tightly and keep the bowl in a warm place for 8-12 hours, until bubbly, risen and fermented. You will be able to smell when it's done (it will have a sour, beer-like smell). If you keep the bowl somewhere cooler, the batter will take much longer to ferment so try to pick a very warm spot. Also, ensure your bowl is deep enough as the batter will rise up and overflow in a small bowl.
- Once the mixture has fermented. add salt. Do not add salt prior to the batter reaching the correct stage as it will delay the fermentation process. For the total amount of batter, I added about 1 1/2 tsp salt but start off with less and taste before adding more. This is a personal choice.
- Adjust the consistency of the batter with a little bit of fresh water at a time. Beat with a ladle and check if it is of a thick, flowing consistency. Again, please refer to the video if you're not sure what I mean by this. When dropping the batter from a height it should billow off the ladle and flow like lava, slowed by the air bubbles inside. This is why it's important not to add too much water when grinding; You can always add water, but you can't take it out. The flavour and smell should be a happy kind of sour.
- Congrats, your dosa batter is now ready. Keep it covered and at room temperature until you're ready to use it. If you're not using it on the same day, you can also store it in the fridge for up to 3 weeks. It will become more sour over time, which adds to the delicious flavour.
- To make the Batata Harra: Boil the cubed potatoes in plenty of water for 3-4 minutes. They do not need to be soft. Drain and allow to steam dry for 5 minutes. Toss with 3 tablespoons of olive oil and sprinkle with salt. Air fry at 180°C/355°F for 10-12 minutes or until they're a medium golden brown and cooked through. You'll need to give the air fryer basket a shake halfway through. Alternatively, you can oven roast or fry the potatoes. Set aside.
- Heat the remaining 2 tablespoons olive oil in a large pan. Add the garlic, lemon zest and red chilli. Saute for 1-2 minutes until aromatic. Sprinkle in the paprika and add the lemon juice, coriander and parsley. Stir well and then quickly tip in the potatoes. Saute for 3-4 minutes. The Batata Harra are now ready.
- To cook the Batata Harra Dosa: For cooking Batata Harra Dosa, a large, flat tawa is preferable. Cast iron and anodised aluminium will give you the most golden finish, but they can be tricky to work with (the dosa can stick if the pan isn't properly seasoned). In any case, ensure cast iron is very well seasoned if you choose to use it. I use cast iron and anodised aluminium interchangeably. You can also make the dosa in a non-stick frying pan but the colour may not be quite as golden brown. Do not use ceramic-coated pans or stainless steel. Make the dosa as big or as small as you like. Start small if this is your first go.
- Heat the pan until it's smoking hot, a few minutes will do. Turn the heat down and flick it with some water to temper the heat. The water should sizzle and evaporate quickly. Rub the pan with an onion half dipped in oil (poke it onto a fork if you like). This is said to add flavour and stop the dosa from sticking. You can also just wipe the pan quickly with a paper towel dipped in oil.
- Pour the batter: Using a ladle, pour a spoonful of dosa batter on the tawa's hot surface. Start from the centre of the tawa and use the ladle to spread the dosa batter thinly and evenly, in a circular motion.
- Add a teaspoon of oil around the sides of the dosa and on top of it. This will help to cook the dosa evenly, with a golden brown colour and also prevent it from sticking to the tawa. Cook over a medium-low heat for 3-4 minutes for the crispiest dosa.
- Once you spot the dosa starting to brown, the edges should start lifting away from the pan. If using cast iron or anodised aluminium, you might need to help it along using a spatula. Try not to prise the dosa from the pan - it will tell you when its ready by coming away by itself.
- Spoon a few dollops of the Batata Harra filling on top of the dosa and add garlic sauce, pomegranate seeds and extra coriander or parsley, if desired. Carefully begin to fold the dosa or roll it into a cylinder. The underneath should reveal a beautiful golden brown colour. Remove the rolled masala dosa from the tawa and serve immediately.
- Repeat the process for the remaining batter, wiping the pan with a lightly-oiled paper towel or cut onion each time. Remember to heat the pan sufficiently each time. Keep the dosas warm in a low oven for 15-20 minutes if you need to. Any longer and they will dry out.
Notes
For a sharp finish, add a drizzle of pomegranate molasses along with the garlic sauce.
Batata Harra Dosa are best eaten straight away. If you must reheat them, try popping them back onto the tawa or in a frying pan with a little butter or ghee to crisp them up again. Be sure to heat through thoroughly.
Use this dosa recipe to make plain dosa (Sada Dosa), ghee dosa, butter dosa or even Uttapam.
Spread the batter very thinly for an excellent Paper Dosa.
The dosa batter can be made in advance and kept in the fridge for up to 3 weeks. You can prepare the potato filling 24 hours ahead, if necessary.
Experiment and try adding your favourite toppings to make customised dosa.
Nutrition Information:
Yield: 6 Serving Size: 1Amount Per Serving: Calories: 746Total Fat: 25gSaturated Fat: 5gTrans Fat: 0gUnsaturated Fat: 17gCholesterol: 22mgSodium: 835mgCarbohydrates: 114gFiber: 10gSugar: 15gProtein: 20g
Pin this recipe for later!

If you like this, you’ll love my recipe for Paneer Masala Dosa
24 Indian Breakfast Recipes Worth Getting Out of Bed For
24 Indian Breakfast Recipes Worth Getting Out of Bed For
From traditional dishes that have been passed down for generations to modern Indian breakfast options that cater to the changing tastes of the community, there are countless Indian breakfasts to choose from. So, let's dive in and explore the rich and varied world of Indian breakfasts.


A cheesy dose of British nostalgia, Desified. Almost every British South Asian home has its' own take on curried baked beans. I cook mine with ghee, cumin seeds and a liberal heap of garam masala. These spicy, buttery beans are then slathered onto toast, topped with Cheddar and grilled until gooey and bubbling.

Light and crispy radish-stuffed flatbreads from the land of Punjab. These make for a delicious Indian vegetarian breakfast alongside yoghurt, achar and masala chai.


This is a delicious recipe for the famous Indian snack, Sabudana Khichdi; a savoury snack made with chewy tapioca pearls, potatoes, peanuts and spices. One bite and you’ll be hooked. Sabudana Khichdi is a traditional dish famed throughout India from Gujarat and Rajasthan, to Maharashtra, Uttar Pradesh, Madhya Pradesh and Karnataka. for its’ comforting carb-on-carb foundations. And for good reason.


Flaky Indian Cheese Twists baked with a blend of two cheeses and Indian spices inside. Use ready-rolled puff pastry sheets for a quick-fix recipe. These Indian Cheese Twists are so simple to prepare and can be made with mostly store-cupboard ingredients. Serve with chai for a delicious Indian breakfast.


The most Perfect Handvo (Gujarati Lentil Cake) recipe. Gujarati Handvo is a golden, fermented rice and lentil cake with vegetables. Some Gujaratis call this delicious tea-time snack Ondhwo. This recipe for Handvo is one I make from scratch, using whole, soaked lentils and rice. No packet mix or handvo flour necessary.
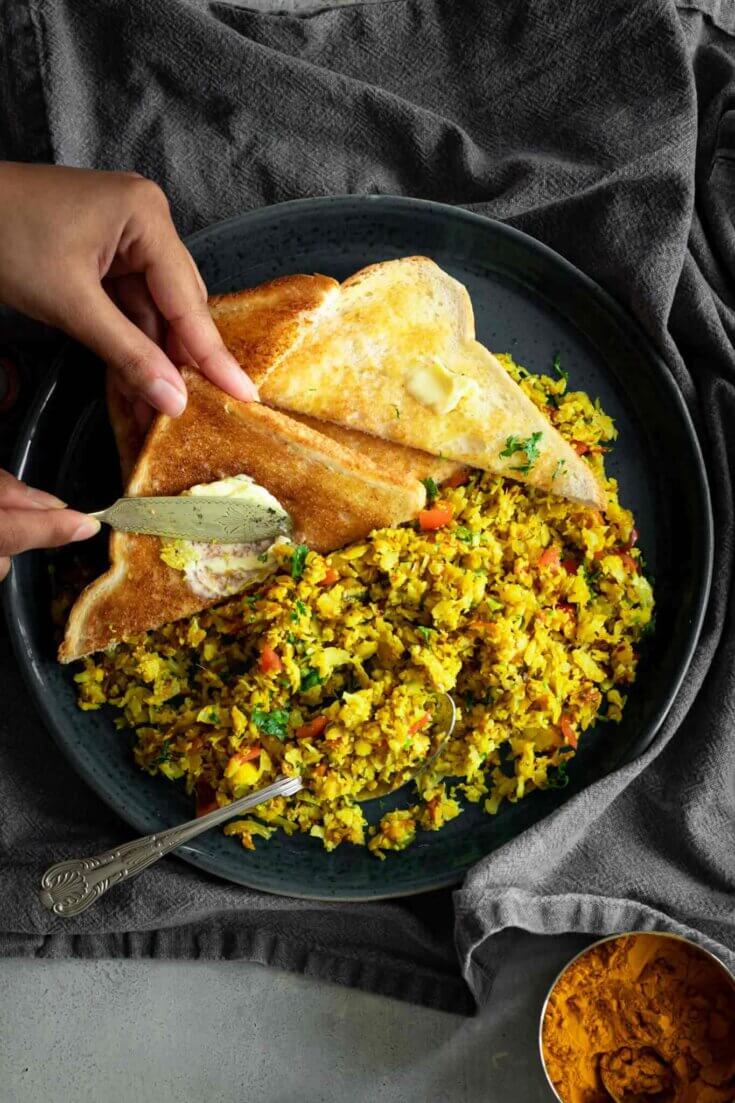

Gobi Bhurji (Indian Scrambled Cauliflower) is one of my favourite ways to enjoy a humble head of cauliflower. This north Indian-style Gobi Bhurji is perfect with buttered toast in the morning. This recipe for Gobi Bhurji is naturally free from gluten (provided you serve it with gluten-free bread). It can easily be made vegan if you switch the ghee for a healthy, vegan alternative like dairy-free spread or oil.


The prospect of an Indian breakfast is sometimes just the kick I need to pull myself from my cosy bed. These Gujarati Dudhi Muthiya are the best way to coax me out from under the covers. Along with a spicy breakfast, there’s nothing more satisfying than using up leftovers. This recipe for Gujarati Dudhi Muthiya hits both of those spots. They’re made using grated bottlegourd (doodhi/lauki), cold leftover rice, chickpea flour and a medley of subtle spices.


Crispy, flaky Aloo Paratha (Potato-Stuffed Flatbread) are an emblem of soulful South Asian home cooking. Almost every home has their own unique recipe and this is my technique for making delicious Punjabi Aloo Paratha at home. Aloo Paratha are crispy on the outside, with a tender potato filling. The word ‘aloo’ refers to the potato stuffing and ‘paratha’ to the light and flaky bread. Of all the stuffed breads India is famous for, Aloo Paratha is the one loved in every family kitchen and such a popular breakfast option. Here’s how I make Aloo Paratha for my family.


Soft Gujarati Thepla are a staple any-time-of-the-day flatbread in Indian homes. Fresh fenugreek leaves give them their signature bitter caramel flavour. Paired with a handful of ground spices like turmeric and chilli powder takes them from everyday roti to a masala-rich paradise. Bonus: they can be made well in advance and stored for days.
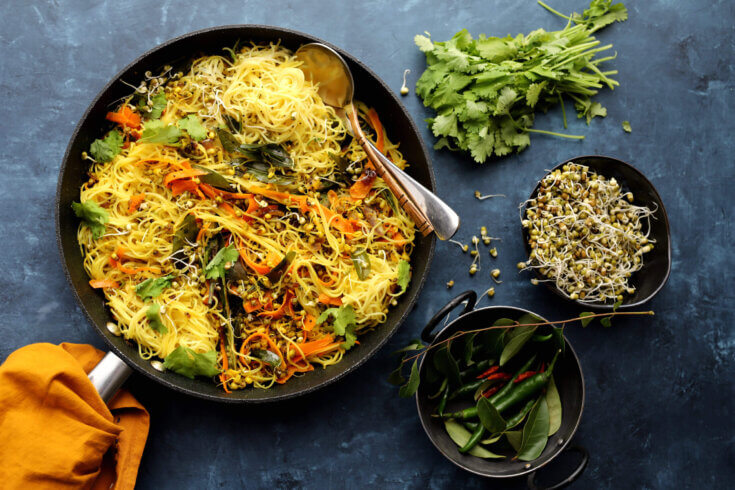

My lightly stir-fried vermicelli noodles are tossed with crackled mustard seeds, curry leaves, chillies and turmeric for a big, punchy breakfast number you’ll cook again and again. Transform it into a filling, protein-rich Indian vegetarian lunch or dinner with the addition of tofu.


I love these topped with strawberries and maple syrup but you can add any toppings you like. Fruit is always a delicious choice but I won’t tell if you scatter a few chocolate chips on top.


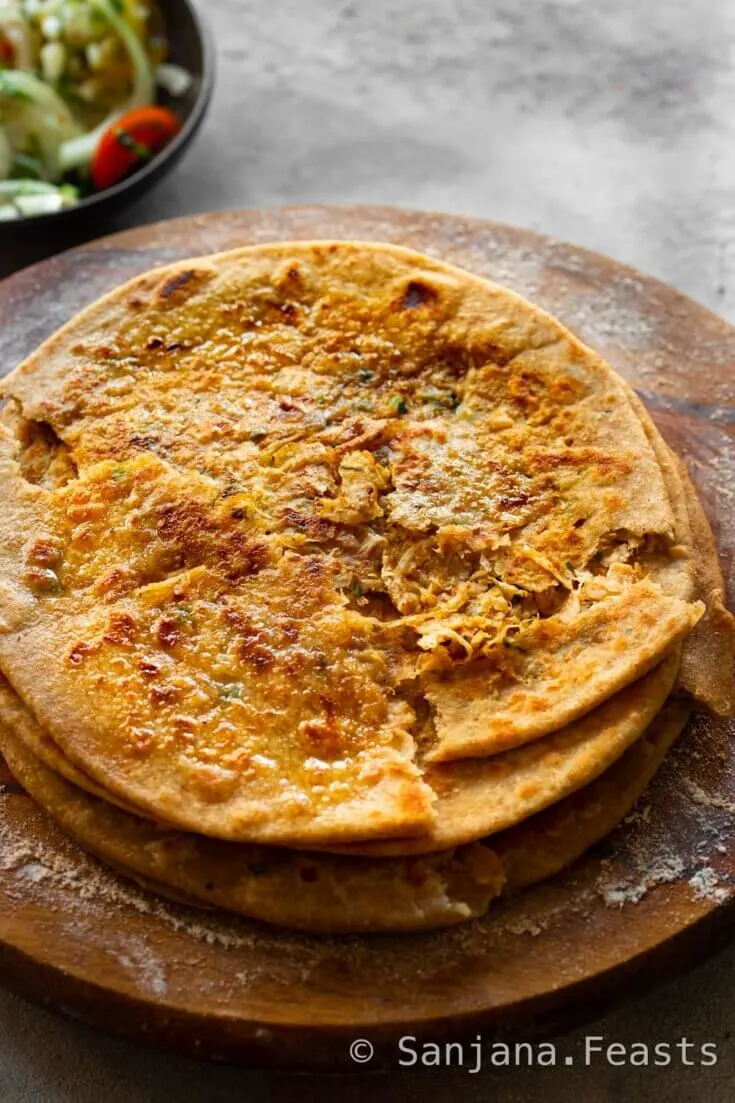
These Jalebi Paratha get their name from the bright orange Indian sweets, Jalebi because of their beautiful coiled shape. I hold this recipe and its stunning method for creating those layers of flaky goodness close to my heart because it’s the way Nanabapu taught my mum, and then exactly the way my mum taught me. A technique passed down the generations and a skill Nanabapu would have wanted us to share with other paratha lovers.
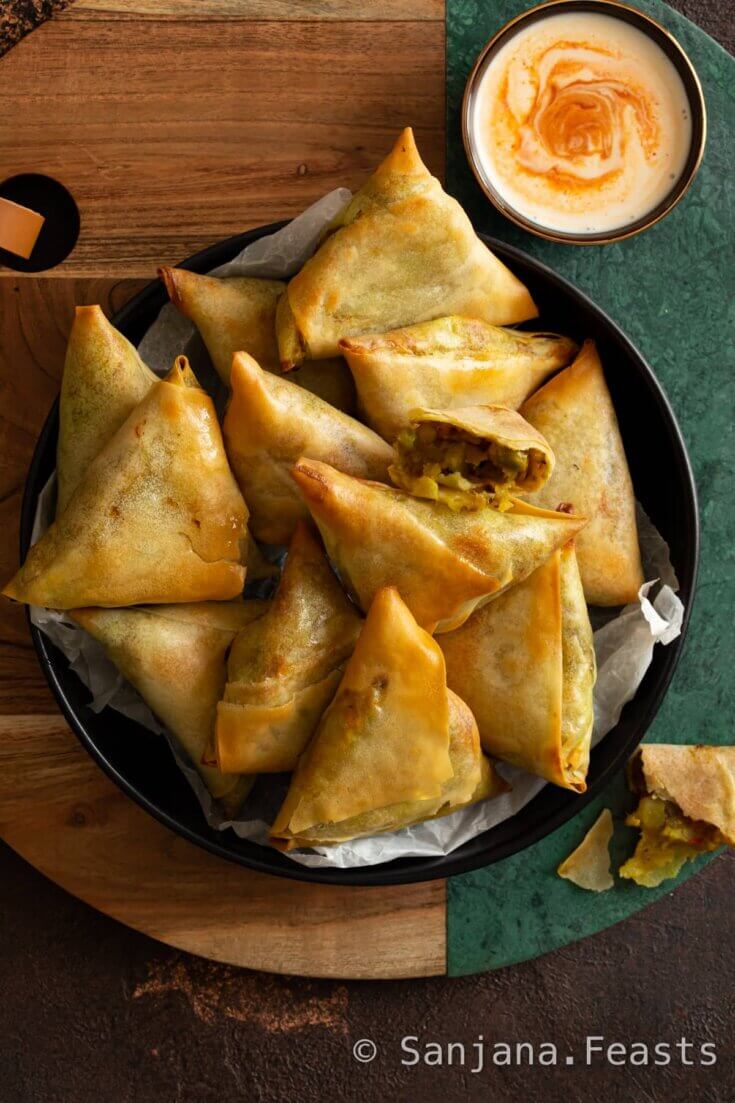

Here’s a delicious recipe for the crispiest, Golden Air Fryer Samosas. You won’t believe these lightly-spiced, vegetable parcels aren’t deep fried! They’re vegan-friendly too. Each samosa is contains a mixture of vegetables, including potatoes, peas, carrots, corn and onions. There’s no need to deep fry then, just air fry to golden perfection. Follow my tips to learn how to cook samosas in the air fryer quickly and easily.
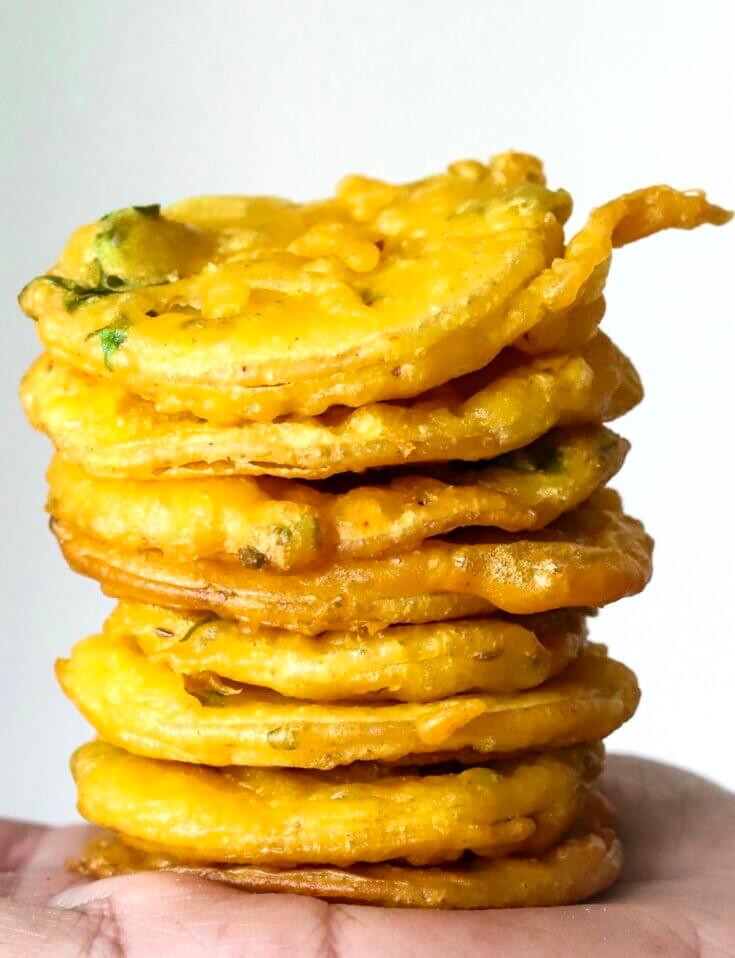

Crispy, spiced potato fritters are the most iconic of bhajias. Here’s a tried and true recipe that will leave you wanting more. Forged from the coming together of two distinct cuisines, Crispy Potato Bhajias have earned their place as a treasured dish on the Indian-East African dinner table. Vegan & gluten free option included.


A tried and true recipe for Gujarati Koru Bateta nu Shaak (dry-style potato curry). This is my mother’s exact recipe and the only way we make it at home. She has a few fabulous tips for achieving intense flavours and the perfect dry bhaji-style texture every time. This shaak pairs perfectly with Masala Poori and dahi (plain yoghurt) for breakfast.

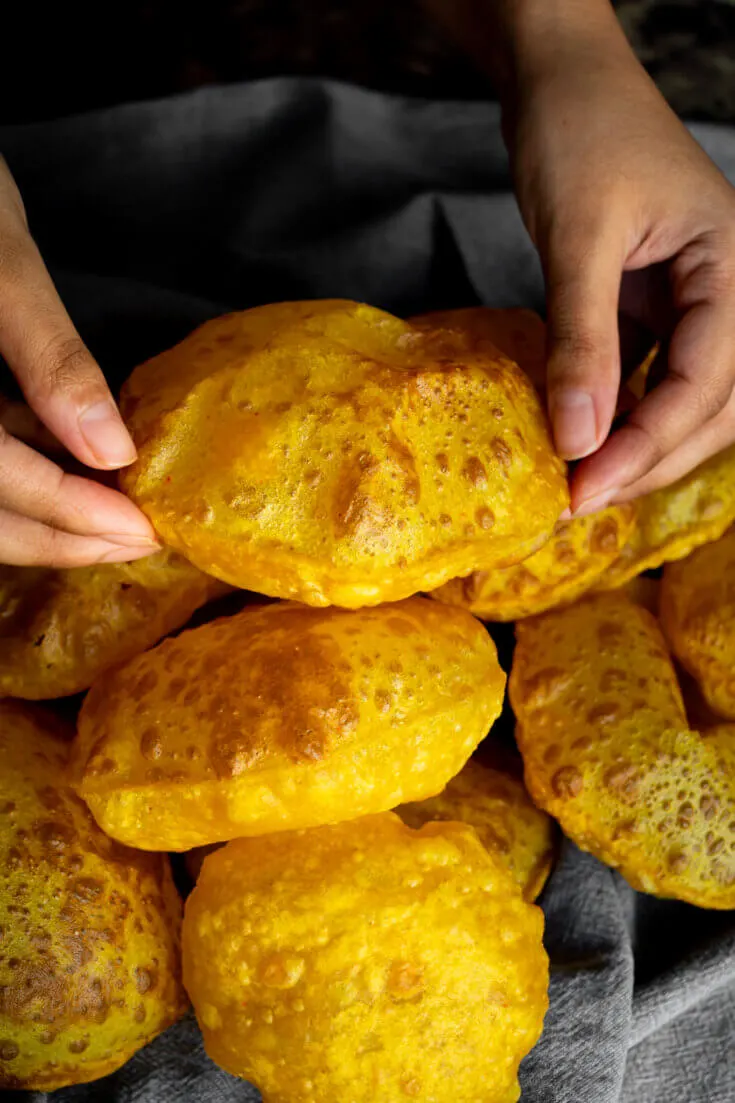
Puffy Masala Poori will forever be a breakfast or wedding food in my eyes. Fried whole wheat flour bread with mild spices, a double layer and hollow middle. The little circles of dough rise before your very eyes for a magical cooking experience — and an even more spectacular eating experience. Definitely worth getting out of bed for!


The ultimate guide to homemade Patra. These steamed colocasia leaves are rolled with sweet and sour tamarind paste inside. Pan-fry for a crispy vegan and gluten-free Indian snack. They're perfect for breakfast and a light way to start the day.


Follow my video tutorial and make this easy Garlic Butter Khichu (Papdi no Lot) recipe. These steamed Indian rice dumplings are soft and chewy in texture. I dip them in the most delicious garlic butter to finish. The combination of garlic butter and cumin against the blank canvas of the rice flour dumpling is so comforting and delicious. Don't eat before a meeting! 😀


Khaman (instant chickpea flour dhokla) is a soft and fluffy steamed chickpea flour cake from Gujarat, western India. This airy, sweet and sour cake is prepared with spices, freshly-grated coconut and coriander leaves. The world of Gujarati farsan, or savoury snacks is as complex as it is vast. 100 varieties of gathia made from fried chickpea flour (besan) are identified by shape, texture and seasoning. Delicious!


Here’s my favourite homemade Chai Masala blend. As the title suggests, I think it’s very good.


Meet The Ultimate Mumbai Sandwich. Stuff this ultra-crispy vegetarian toastie with masala potatoes, melting cheese, beetroot, onions and, wait for it… an extra slice of toast soaked in green chutney — a.k.a. the ‘Moist Maker’. Top with crunchy sev (fried chickpea flour noodles) for a true taste of Mumbai street food.


This is not just any old wrap. This is a flavoursome, satisfying chapatti wrap filled with rich paneer, tangy lemon and mouth-watering spices. Seriously, M&S would be proud. These kati rolls are simple, filling and perfect for breakfast. You can stuff them with anything you like, from scrambled paneer to Bombay potatoes.

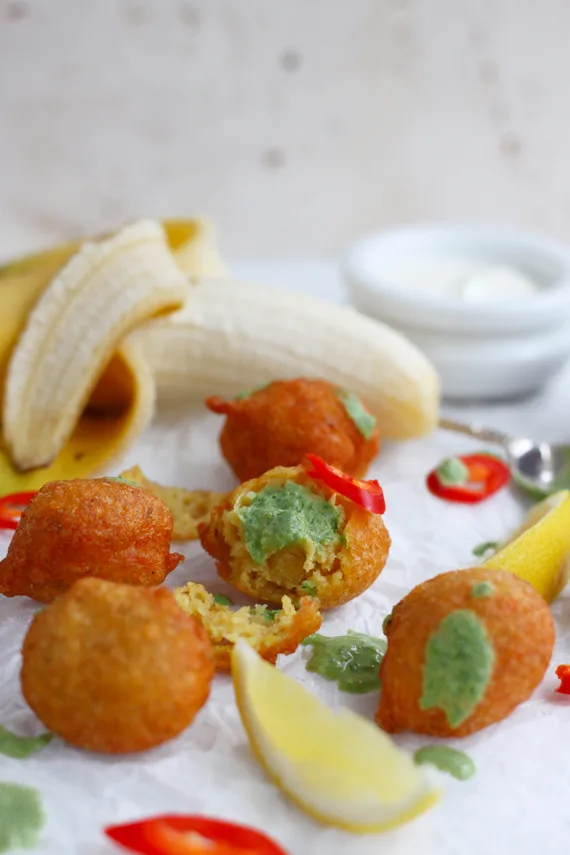
Traditional Gujarati Daal Vada are crunchy, spicy and perfect for dipping into yoghurt. My East-African version incorporates bananas to add a hint of sweetness against the intense chilli and lemon heat. The magical thing about adding ripe banana to the batter is that it reacts with the lemon and baking powder, creating a puffy, fluffy-in-the-middle fritters that still have an incredible golden crunch on the outside because of the ground mung daal, urad daal and rice.


Never underestimate the power of Masala Cheese Scones and a mug of hot tea. This casual comfort combo is my go-to for when I need a dose of nostalgia. One bite of spicy cheese scone followed by a swift sip of sweet chai and I’m transported back to my childhood kitchen.